Halloween nails are the one part of your costume you wear everywhere — at the office party, on the train, in every photo. And unlike a costume, nobody's judging the fit. Whether you're going full spooky or just want a subtle nod to the season that won't raise eyebrows at work, there's a design here for your skill level and your nail length.
These 18 ideas are all doable at home with regular polish. A few use nail stickers or press-ons (no shame — they exist for a reason), and every one is honest about how fiddly it actually is. For a full face to match, pair any look with our easy Halloween makeup ideas.
Subtle & wearable (work-friendly)
1. Black French tips
The classic French manicure, but the tips are black instead of white. Do a sheer nude base, then paint just the tips with black polish using the edge of the brush. It's spooky-season without being costume-y, and it works on every nail length. If your lines wobble, that's what cleanup brushes are for — dip one in polish remover and tidy the edges.
2. Deep burgundy, all over
One coat of oxblood or black-cherry polish on every nail. It reads Halloween-adjacent — dark, moody, a little vampiric — but you can wear it straight through Thanksgiving. Two coats for full opacity, and top coat matters here: dark polish chips show fast without it.
3. Nude base with one tiny ghost
Paint all nails a neutral nude or sheer pink, then add a single tiny ghost on one accent nail (ring finger is the classic). The ghost is just a white blob with two black dot eyes — genuinely one of the easiest designs to freehand. It takes five minutes and gets compliments every time.
4. Matte black with one glitter accent
All nails in matte black (matte top coat over regular black polish), with the ring finger in gold or copper glitter. The matte-versus-sparkle contrast is what makes this look expensive rather than flat. Short nails carry this one beautifully.
5. Tortoiseshell fall
Tortoiseshell isn't strictly Halloween, but the amber-and-brown swirls scream autumn and they hide chips better than any solid color. Layer a sheer amber or orange jelly polish over brown blobs, then drag through them lightly with a toothpick while wet. Seal with glossy top coat.
Classic spooky (the ones people recognize)
6. Blood-drip French tips
A nude or pale base with dark red "drips" painted down from the tips. The trick: paint the red tip line first, then use a thin brush or toothpick to drag a few uneven drips downward. Uneven is good — perfect drips look fake, messy drips look like blood. Seal with a glossy top coat for the wet look.
7. Spiderweb accent
Black polish on all nails, then a white spiderweb on one or two accent nails. The web is just a few straight lines radiating from one corner with curved connecting arcs — draw it with a thin brush or a nail-art pen. Add a tiny spider (a dot with four leg lines) if you're feeling ambitious.
8. Candy corn tips
White base, then paint the tip in a gradient: orange in the middle, yellow at the very edge, like a candy corn. The easiest method is sponging — dab the colors onto a makeup sponge and press it onto the tip. It takes a little cleanup around the edges, but the result is instantly recognizable.
9. Jack-o'-lantern faces
Orange base, then black triangle eyes and a jagged mouth on each nail. The faces don't have to match — different expressions on each nail is the whole charm. A dotting tool or the tip of a bobby pin works for the eyes; a thin brush handles the mouths.
10. Vampire ombré (red to black)
A gradient from deep red at the cuticle fading to black at the tip. Sponge it on: paint red and black stripes on a makeup sponge and dab onto the nail, building up layers. It looks dramatic in person and photographs incredibly well with dark lipstick.
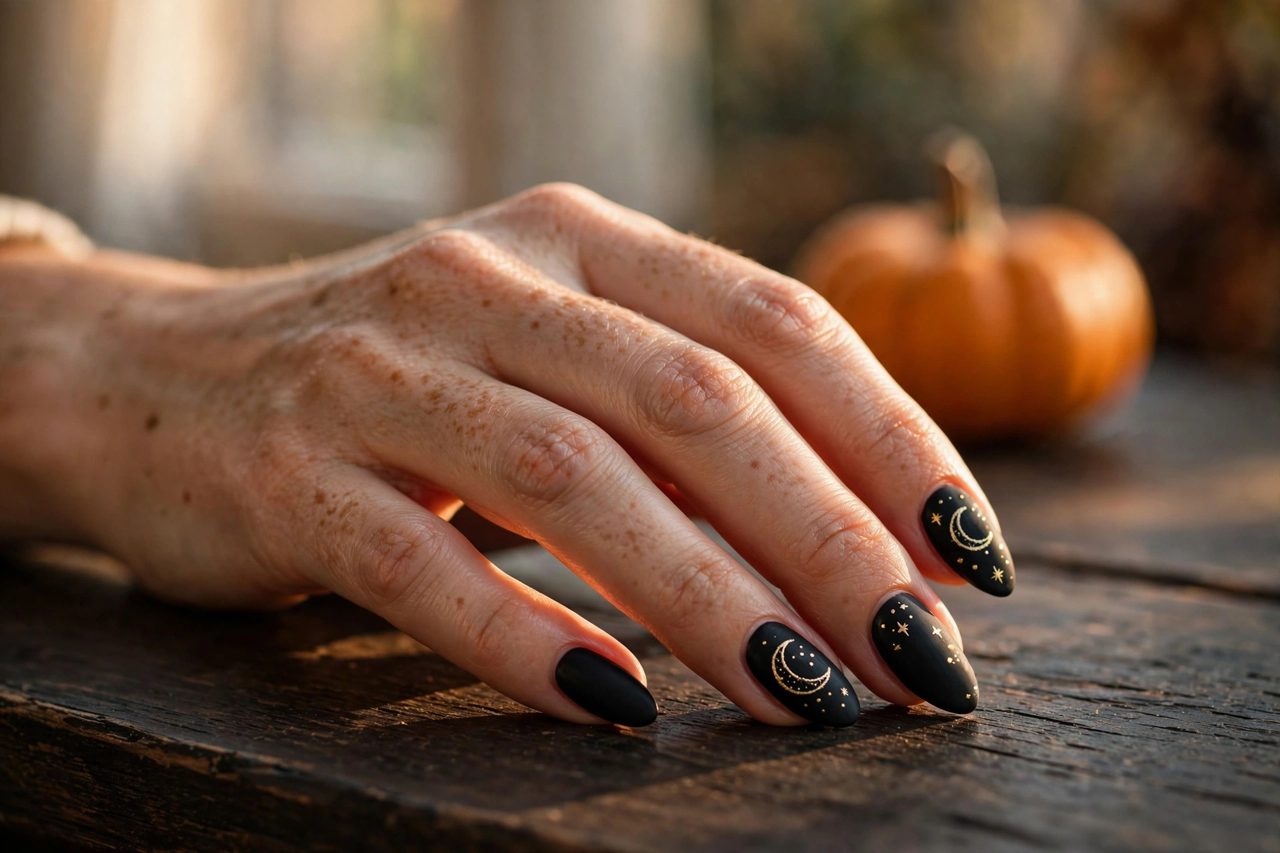
11. Black cat-eye with moon and stars
Black or deep navy base, then paint a tiny gold crescent moon and a few stars on one or two nails. Gold polish or a gold nail-art pen over black is the highest-contrast combo on this list. It's the design in our cover photo, and it's simpler than it looks — the moon is just two overlapping circles.
Glam & extra (party nails)
12. Orange chrome
Orange chrome powder over a black base gives that molten-pumpkin metallic finish that's all over feeds this year. You rub the powder onto a tacky gel or regular-polish base with a sponge applicator and seal with top coat. Messy to apply, stunning to wear — do it over newspaper.
13. Glitter graveyard
Dark purple or black glitter polish on every nail, with a few nails getting hand-drawn white crosses or "RIP" in a nail-art pen. It's maximalist and a little silly, which is exactly the Halloween energy. Glitter polish also lasts longer than cremes, so this one survives the whole party weekend.
14. Silver chrome with black art
Silver or gunmetal chrome nails with thin black line-art on top — bats, moons, tiny skulls. The chrome base does the heavy lifting, so the art can be minimal: even just a small black bat silhouette on each ring finger reads as a full design.
15. Velvet matte black
A magnetic "velvet" or cat-eye black polish gives nails a soft shimmering depth that reads luxurious rather than flat. Hold the magnet over each wet nail for a few seconds to set the effect. Pair it with a dark costume and it looks like part of the outfit.
Short nails & last-minute (the night-before saves)
16. Polka-dot ghosts
White polka dots on a black base, with two tiny black dots inside a few of the white dots to turn them into ghost faces. A bobby pin makes perfect dots. This works on the shortest nails on this list and takes about fifteen minutes for both hands.
17. Press-on Halloween set
A full set of Halloween press-ons takes ten minutes and looks salon-done in photos. The key is sizing: lay out all ten nails before gluing, and file the sides slightly if they're too wide. Press-ons with pre-applied designs (webs, moons, blood drips) beat a rushed DIY job every time. Keep the glue away from your cuticles.
18. Single accent nail
The true last-minute move: paint all nails one Halloween color — black, burgundy, dark purple — and do a single design on each ring finger. One web, one ghost, one moon. It takes five extra minutes over a regular manicure and reads as intentional nail art in every photo.
Halloween nail art at a glance
| Idea | Vibe | Difficulty | Approx. time |
|---|---|---|---|
| Black French tips | Subtle | Easy | 30 min |
| Deep burgundy | Subtle | Easiest | 20 min |
| Nude with tiny ghost | Subtle | Easy | 25 min |
| Matte black + glitter accent | Subtle | Easy | 30 min |
| Tortoiseshell fall | Subtle | Medium | 45 min |
| Blood-drip French | Spooky | Medium | 40 min |
| Spiderweb accent | Spooky | Medium | 40 min |
| Candy corn tips | Spooky | Medium | 45 min |
| Jack-o'-lantern faces | Spooky | Easy | 35 min |
| Vampire ombré | Spooky | Medium | 45 min |
| Cat-eye moon & stars | Spooky | Medium | 40 min |
| Orange chrome | Glam | Medium | 50 min |
| Glitter graveyard | Glam | Easy | 40 min |
| Silver chrome + black art | Glam | Medium | 45 min |
| Velvet matte black | Glam | Easy | 30 min |
| Polka-dot ghosts | Last-minute | Easiest | 15 min |
| Press-on set | Last-minute | Easiest | 10 min |
| Single accent nail | Last-minute | Easiest | 25 min |
Beginner tips that actually matter
- Thin coats, always. Two thin coats dry faster and chip less than one thick one — this is the single biggest difference between nails that last three days and nails that last a week.
- Cap the free edge. Run the brush along the very tip of the nail with each coat, including top coat. It seals the edge where chips start.
- Cleanup brush > steady hand. A cheap angled brush dipped in polish remover fixes wobbly lines better than trying to paint them perfectly in the first place.
- Top coat is not optional. Especially for dark colors and glitter, a glossy top coat is what makes DIY nails look finished instead of crafty.
- Remove glitter the smart way. Soak cotton pads in remover, press onto each nail, wrap in foil for five minutes, then slide off. Scrubbing glitter off dry ruins the nail surface.
- Do nails before the party, not at it. Give polish at least an hour before you need your hands — fake blood, face paint, and costume glue do not mix with wet nails.
How we choose
We pick Halloween nail ideas by three rules: a beginner should be able to finish the design in one sitting without special salon equipment, it should work on real nail lengths (including short nails), and the difficulty rating has to be honest — a design that needs a steady hand and three tools doesn't get labeled "easy." We skip anything that requires gel curing lamps or professional products, and we say so when a press-on set will genuinely look better than a rushed freehand attempt. If you're building a full Halloween look, start with the nails and match your makeup to them — it's easier than the other way around.